July 23, 2013

Spicy Green Bean Zucchini

My hubby and I are trying to eat healthier. We've been camping a lot lately and have had a few too many s'mores, chips, and hot dogs. So today I developed this veggie dish that was so delicious.


Ingredients:
Half of a medium zucchini, in 1 inch chunks
1 handful of fresh green beans, cut into 1 inch strips
2 Tbsp Olive Oil
1/2 Onion, diced
6 pieces of diced jalapenos
1 tsp crushed red pepper
1 tsp fresh basil
salt
pepper
1/4 c. shredded cheese

1. Heat oil in a pan over med-high heat.
2. Toss in the zucchini, green beans, and onion.
3. Saute veggies for 5-10 min.
5. While veggies are sauteing, add jalapenos, crushed red pepper, basil, salt, and pepper.
6. After the zucchini is tender, remove the pan from the heat. I thought the dish was too spicy, so I would recommend taking out the jalapenos - the flavor will still be in the dish.
7. Sprinkle with shredded cheese and let it melt.

Enjoy!

July 22, 2013

19 Pounds of Strawberries

Mmmmmm, it's strawberry picking time!


It was the first time my husband and I went strawberry picking. I had no idea how many to pick. I thought four containers would be perfect....and 19 pounds of strawberries later, I wondered what I had gotten myself into!

You might be laughing to yourself thinking, "That's a lot of berries!" (and work!). But this is what I did:

1. Strawberry Jam
2. Strawberry Ice Cream Topping
3. Chocolate Covered Strawberries
4. Frozen Strawberries for Smoothies
5. Fresh

Keep reading to see how I was able to whittle those strawberries down to only 6 cups to eat fresh...

Strawberry Jam Yield: 4 Half Pint Jars

Step 1: Get those jars, lids, and rings sterilized! Boil in water for 10 minutes.

Step 2: Find a recipe to use for your strawberry jam. 
I used the recipe from the Ball RealFruit Classic Pectin container. 
Measure out your strawberries into a small layer.
Step 3: Smash the strawberries with a potato masher or pastry cutter (like me).
Then add more strawberries (for 4 half-pint jars I needed 2 2/3 c. of mashed berries).
Step 4: You want the berries to be quite mashed, but still chunky so you can tell what you're eating.

Step 5: I measured out 2 cups of white sugar, 3 Tbsp Ball RealFruit Classic Pectin,
 with my 2 2/3c. strawberries.

Step 6: Before I started cooking the jam, I set out the jars, lids and rings.

Step 7: Pour the strawberries and fruit pectin into a saucepan over med-high heat. Stir occasionally.
You are going to want the mixture to come to a full rolling boil that cannot be calmed down when you stir it.
Step 8: Once it starts to boil, add the sugar and stir constantly. You want the mixture to return to the rolling boil. Boil hard for 1 minute.
Step 9: Remove from the heat and begin ladling the jelly into the jars you have prepared.


Step 10: Wipe off the rim of the jars with a wet rag or paper towel so the lids will seal tightly. Place the lids and rings on the jars - only tighten with your fingertips, not your whole palm (that will make the lid too tight).
You will place the closed jars in a canner and process for 10-15 minutes, depending on your canner. 


Once the jars have processed, take them out and set them on the counter. You may hear them pop and seal right away, but some may take 24 hours to seal. Just let them sit, don't mess with them - it could take 2 weeks for the jam to set! Mine set almost right after they cooled.

The next day I made 5 more (half-pint) jars of strawberry jam.

Next I made some Chocolate Covered Strawberries:

I melted 1/2 bag of semi-sweet chocolate chips over low heat in a saucepan on the stove. I picked strawberries that were firm and used a toothpick to poke them and dip them in the melted chocolate. I then placed them on a wax paper covered plate. I placed them in the refrigerator to harden. Yum.

Third, I made Strawberry Topping - I found it on Brown Eyed Baker's blog. I decided to can this strawberry topping recipe into three pint jars - so I had to triple the recipe. It smelled amazing! I can't wait to put it over vanilla ice cream.


Lastly I Flash Froze strawberries for smoothies. A very common mistake that people make when freezing fruit is they put fresh fruit in a freezer bag and throw it in the freezer. Bad idea. All the fruit will stick together. Flash Freezing is the method that allows each individual piece of fruit to coat itself with frost, preventing them from sticking together when you put them in a freezer bag. 

Flash Freezing:
Lay berries out on a cookie sheet in a single layer - try to keep them from touching (this will make it easier in getting them off the cookie sheet). Place a piece of wax paper (same size as cookie sheet) over the berries on the pan. Place another layer of berries on top of the wax paper. This creates two-layers of fruit on one pan to freeze more berries quickly. Place the pan in the freezer for an hour or two, until you feel a coating of ice on the berries. Once they have an ice coating, pull the berries off the top layer of wax paper and pull them off the pan on the bottom layer. Pour them into a freezer bag and pop the bag into the freezer. Boom. You have strawberries for smoothies - and they won't be sticking together.


After all these strawberries were processed how I wanted them, I still had 6 cups left for fresh eating.
After all, I believe 19 Lbs of strawberries was perfect!


July 18, 2013

Coffee Table Turned Ottoman

Last year when my husband and I moved, we went to Ikea and bought a bunch of furniture for our new apartment. Overtime I've noticed that the tops of our coffee table and other dressers are getting some scratches. We considered buying those glass tops to cover them. But then I had an idea - how about we turn our coffee table into an ottoman! We put our feet on it all the time anyways, but that sharp edge always digs into the back of our calves. A comfy ottoman would be awesome! I figured there had to be blogs online of how to do it - I couldn't possibly have been the first genius to think of this. I decided to Google search this: "how to turn Ikea coffee table into ottoman" - and boom, I found the perfect blog with picture directions!


So without further ado, here is how we did it. Yes, my hubby decided to help me, but I will not let him take credit for the idea to do this to our coffee table - that was all me. ;)

1. I went to JoAnn Fabrics (they are having a HUGE coupon promotion right now) and bought these items:
  • Richloom Studio-Presidio Water Fabric: 2 Yards
    • Originally 29.99 per yard, but on sale: $17.99/yd
    • I decided to splurge on the fabric because A) It matches our living room theme/color exactly  B) We were upholstering a huge item in the living room for all to see C) I wanted it to last since we will always be putting our feet up on it.
  • Heavy Duty Staple Gun & Staples:
    • Staple Gun: $10.50 (50% off coupon)
    • Staples: $2.30 (50% off coupon)
  • Low-Loft Batting (This is where I stood in the store the longest, very unsure of which "loft" to get for this project.
    • Batting: On Sale for $7.49
  • 2" High Density Foam (2 squares)
    • Foam: On Sale $6.99 each
  • Other supplies: Utility Knife, Duct Tape, Scissors
Richloom Studio-Presidio Water Fabric


2. First, my husband measured and cut the foam with a utility knife to fit the table. I read somewhere online that spray adhesive doesn't work very well to get the foam to stick to the table. We used a few pieces of handy duct tape - and it worked great! It kept the foam from sliding as we put the batting on.


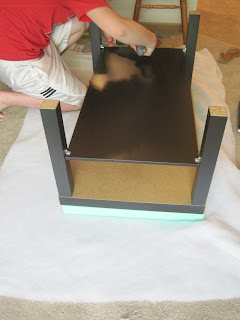
3. Next we laid the batting out on the floor - I had enough to fold it in half for a little extra loft on the ottoman. We flipped the table upside down onto the batting. At this point we realized we had to take the legs off the table - so we did. After the legs were off, we used the staple gun to staple the batting around the table, pulling it tight. There was quite a bit of extra batting on the underside of the table, so we used scissors to cut some off. Next we poked/cut holes in the batting so we could see where the legs would go for later on.


We were almost done stapling the batting on the table and we got a jam in the staple gun! A bad one! It took my husband over an hour to get the staples out of the staple gun. This was not a quick fix -he had to take the whole thing apart! We were finally able to proceed after his wonderful effort to fix it.

4. After the batting was securely fastened, we laid the ironed fabric on the floor. We used the staple gun to securely fasten it to the underside of the table as well - doing our best to make "clean corners" (I need to look more into this on our next project). I got really excited as the finished product started coming together. Next my husband cut holes in the fabric so we could screw the table legs back in - and as he did, the knife slipped and he cut his finger! (not "Emergency Room" bad)

After we bandaged his finger up, we screwed the legs back into the table (above).

And here it is - our first upholstery project ever!

Our next project is to cut the legs down a few inches for a
more comfortable level. But for now, it's just fine.